You've spent months building an app, and when it finally comes time to distribute it to the App Store, you realize it’s not going to be an easy task. Even when you’re just releasing some updates, you have to perform each step in the right order and to Apple’s exacting specifications: code signing, creating the app and version in App Store Connect, running tests, archiving and uploading the build, and generating and setting various metadata and screenshots. This is where the app automation platform fastlane comes in.
fastlane is an open-source suite of tools that allows you to automate your iOS or Android mobile app releases, potentially saving you hours of development time. It is powered by a Ruby configuration file called a Fastfile, in which you can add lanes to serve different purposes.
In this tutorial, you’ll see how to build a local fastlane pipeline that will automate the final steps of the iOS development and deployment process. You’ll add lanes for signing, testing, building, and deploying a simple “to-do” list application. At the end of this tutorial, you should have everything you need to build the perfect fastlane pipeline for your next iOS app.
Setting up fastlane
There are many ways to install fastlane, but we’ll use Ruby for the task. Excitingly, there’s also a Swift version of fastlane that’s currently in beta.
Confirm that you have Ruby installed on your machine by opening Terminal and running:
If Ruby is not installed, follow their instructions here to install it.
Next, set up the Xcode command-line tool (CLT). It can be enabled with the following command:
Now, you're ready to install fastlane. Run the following command to add the Ruby gem for the project:
When the installation is complete, confirm it by running the following command:
Congratulations! You're ready to use fastlane in a new project.


Configuring fastlane for a project
For this tutorial, we’ll use a demo app called ToDo. You can find the finished source code here on Github in case you miss something. You will also need to have a paid Apple Developer account to complete this tutorial.
To get your new app started, open Xcode and create a new app.

To initialize fastlane inside the project, go to the project’s root directory in your terminal and run the following:
fastlane will ask you to choose a single automated action to implement. Automated actions are pre-built actions that let you automate various aspects of your development and release workflow. You'll implement multiple automated actions in this tutorial, so just select manual setup by entering 4.
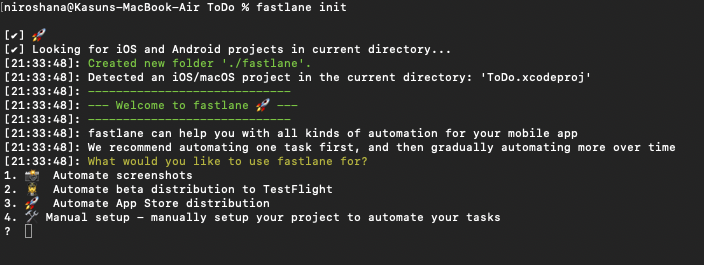
Go to the root directory of the project. You will see a new Gemfile, which includes project dependencies, and a <code>./fastlane<code> directory containing an Appfile and a Fastfile.
- Appfile - contains a bundle identifier and your Apple ID.
- Fastfile - contains the <code>fastlane.tools<code> configuration and actions.
For this tutorial, we’ll be using an App Store Connect API Key to authenticate, so you won’t need your <code>apple_id<code> — feel free to delete the <code>apple_id<code> line in the generated Appfile.
Uncomment the app_identifier line, and enter your app’s bundle identifier like so:
You can later easily access your app identifier in any lanes:
Authentication and the App Store Connect API key
fastlane offers a few different ways to authenticate against your App Store Connect account. Now that Apple provides an official, public API to interact with App Store Connect, the preferred approach involves authenticating against this API using an App Store Connect API key. Note that some fastlane actions are not yet supported by the official API, but most common actions are. (If you do find yourself needing to authenticate using one of fastlane’s other methods, note that Apple now enforces two factor authentication [2FA] for all accounts, and this introduces complications and flakiness, especially if you’re running your fastlane script from a bot or on a remote machine.)
In order to use the App Store Connect API, fastlane requires the following:
- App Store Connect API key filepath or content
- Issuer ID
- Key ID
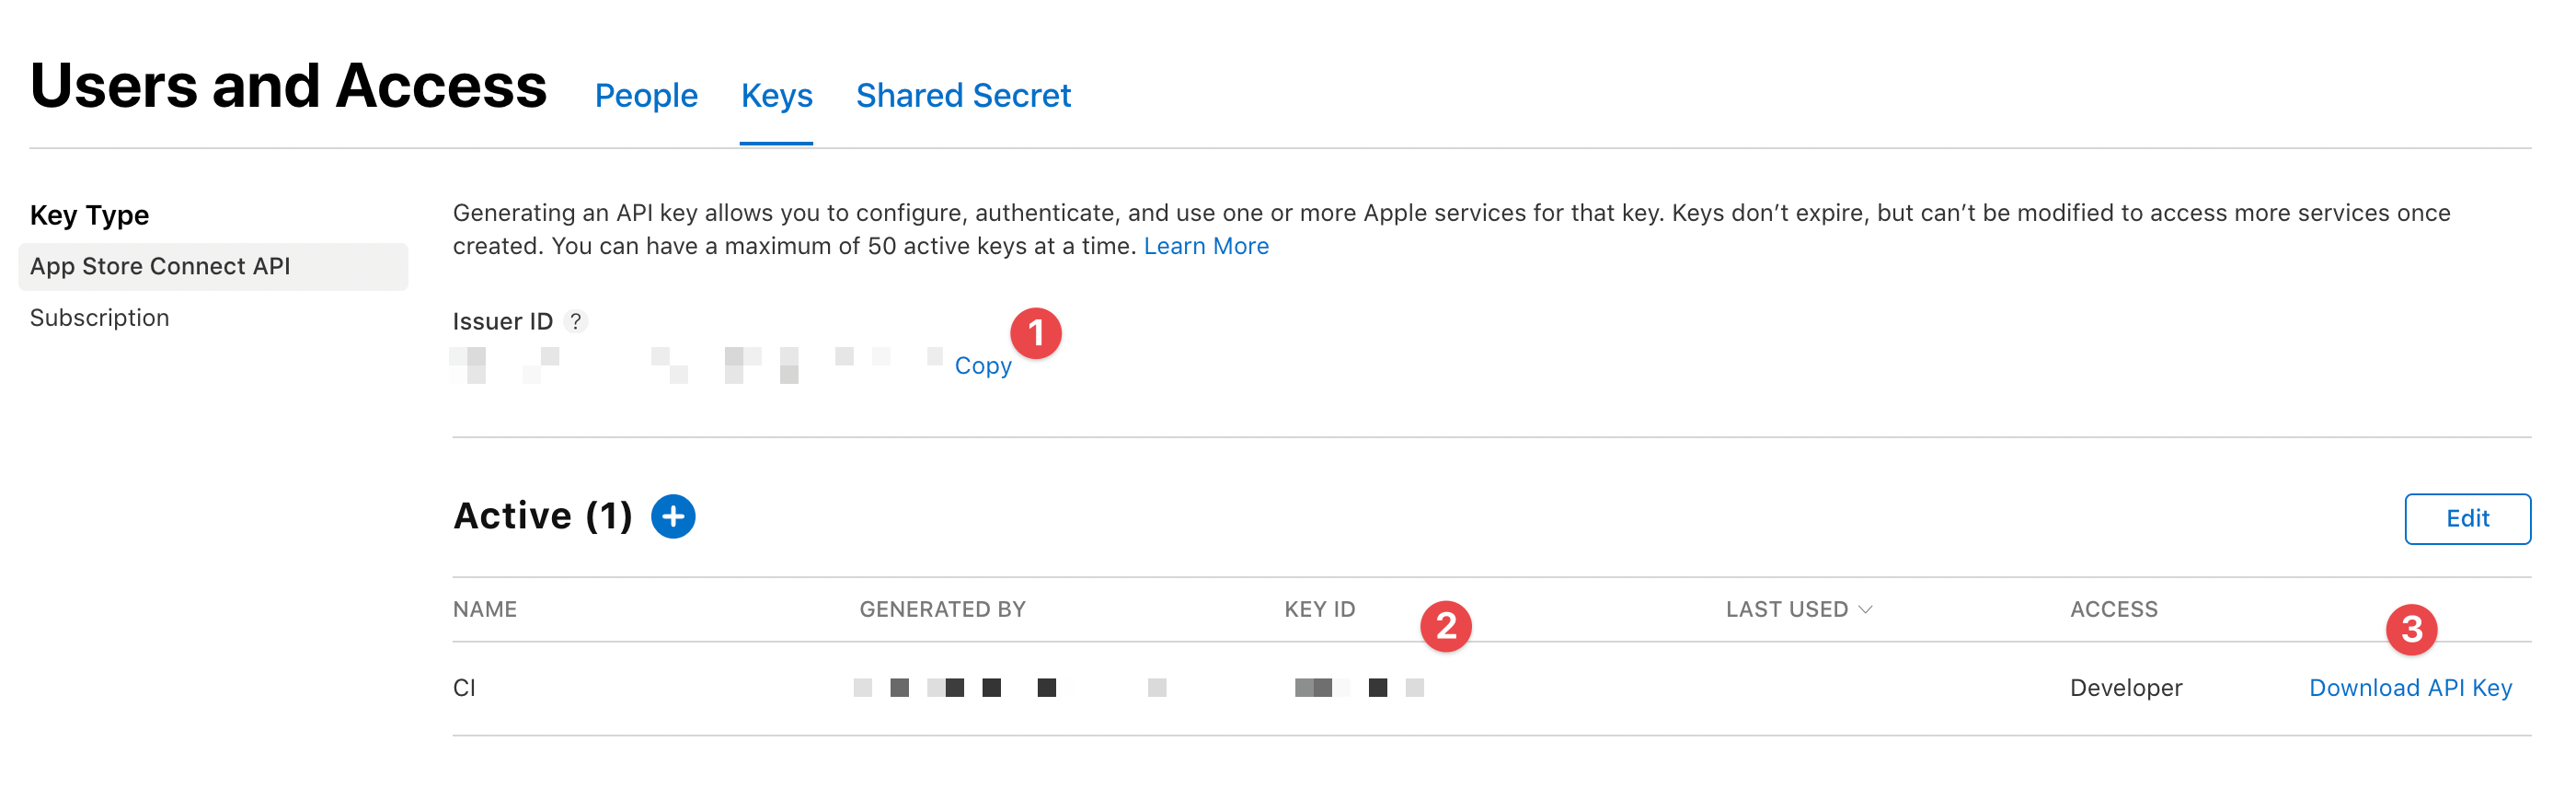
Creating an App Store Connect API key
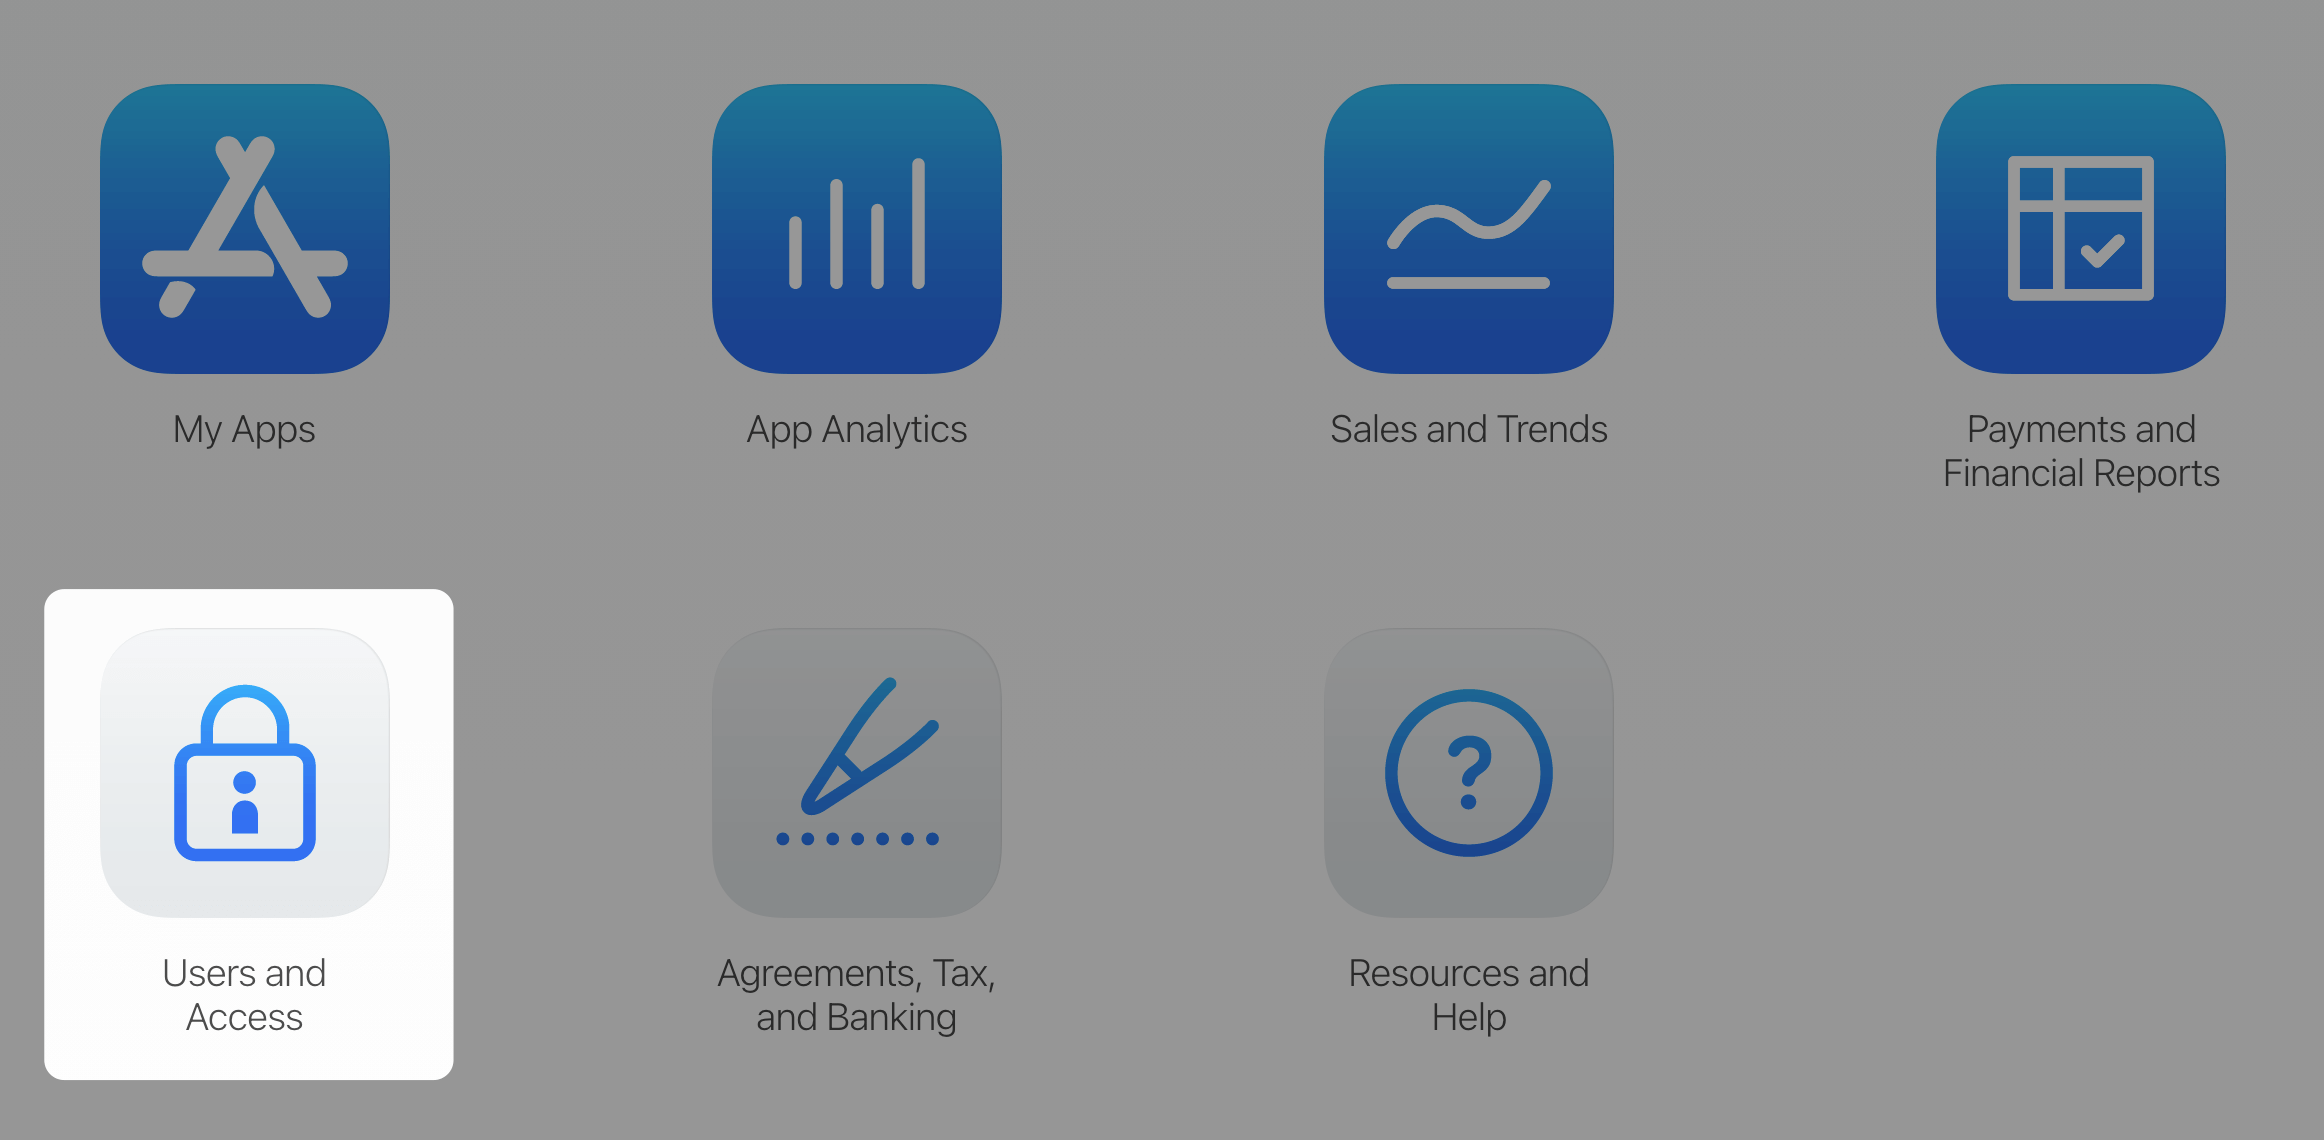
To create a key, you need to have Admin permissions in your App Store Connect account. Here are the steps you need to follow:
- Log in to App Store Connect
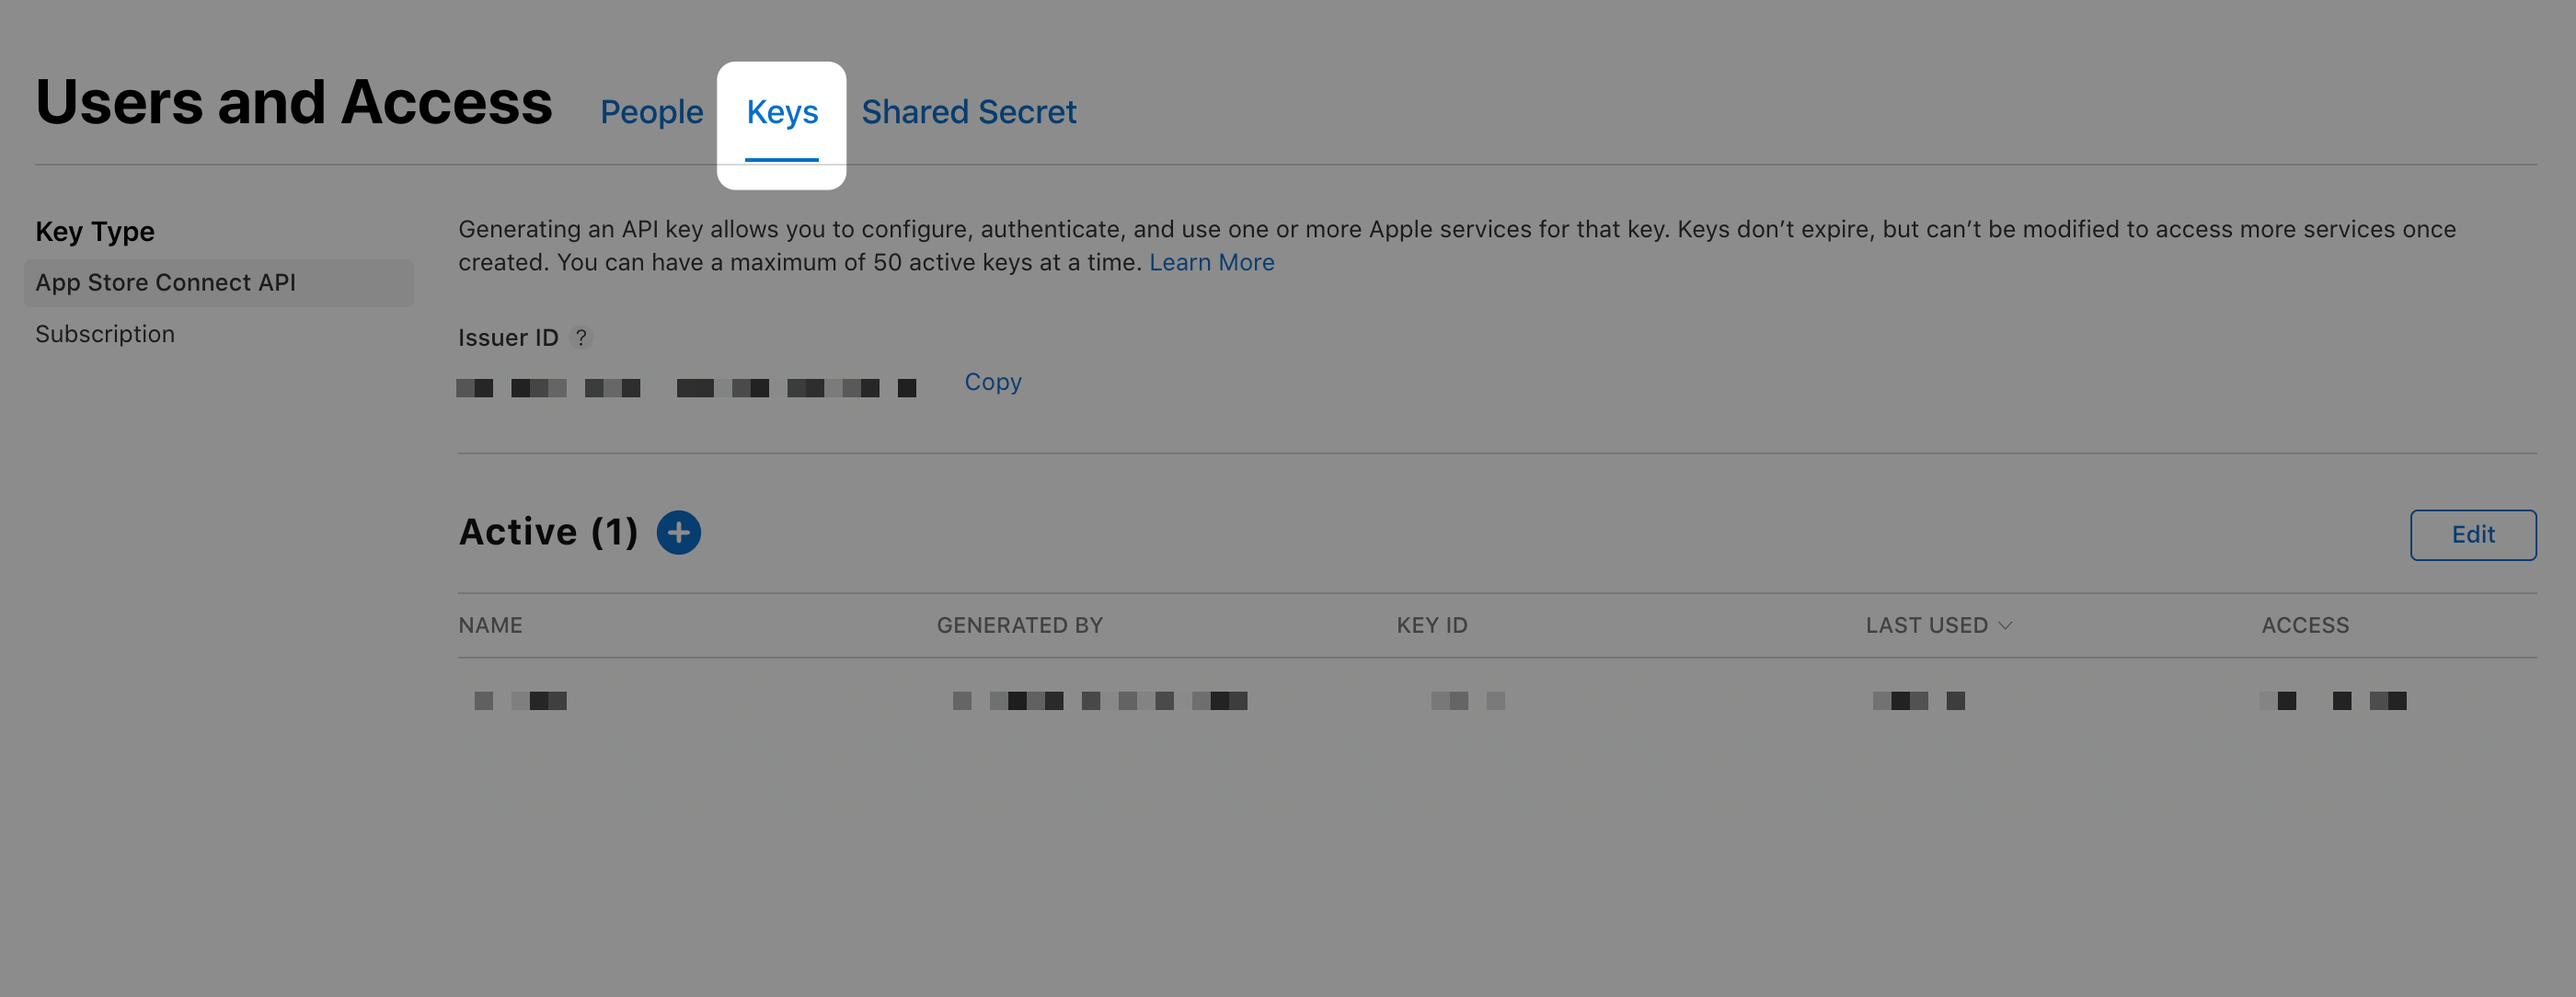
- Navigate to Users and Access
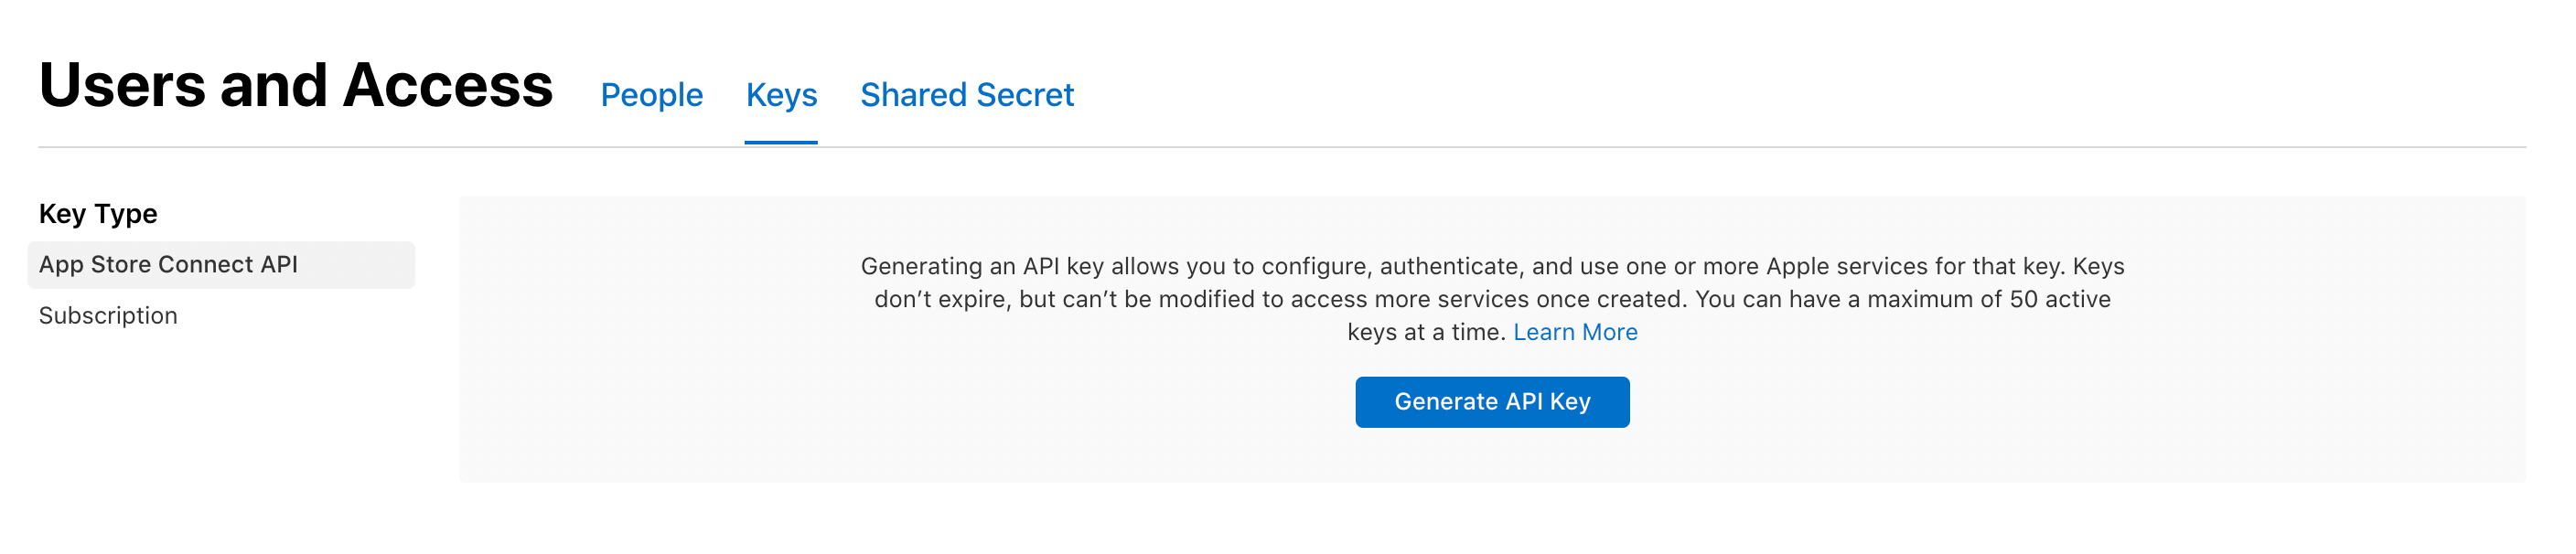
- Select the Keys tab
- Click Generate API Key button
- Enter a name for the key.
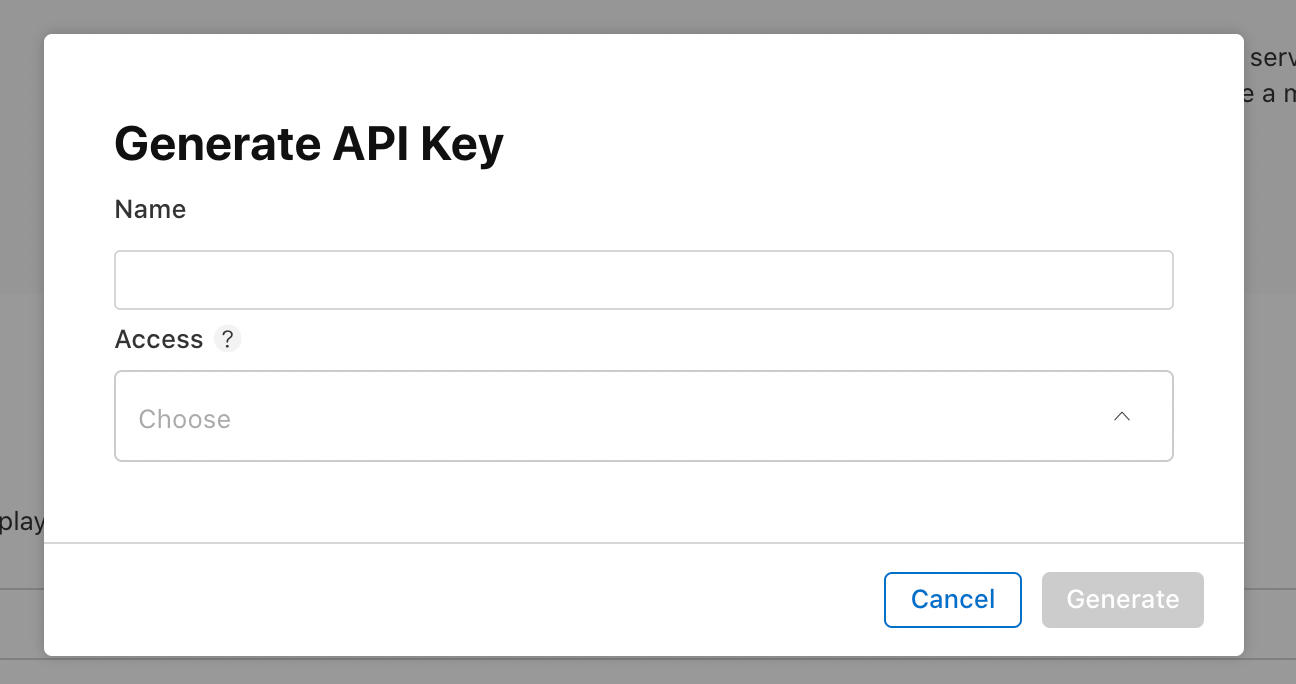
- Select at least one role. Remember to provide the minimum level of access needed.
- Click Generate
The key will appear on the page once created successfully.
The API Key will be in <code>.p8<code> format. You might consider using a base64-encoded version to avoid running into this known issue.
To encode your key, run the command below:
Now you have everything you need to authenticate against the App Store Connect API. Next, we’ll use theAPI key you generated to run a fastlane lane.
Using App Store Connect API key
fastlane uses the <code>app_store_connect_api_key<code> action to authenticate. You’ll pass in your key ID, issuer ID and key filepath as environment variables or direct values.
You can add the following call inside a lane to authenticate before performing some actions:
You can also use default environment variables that automatically load in if set, avoiding the need to provide the values as arguments. Here are some of the keys you might use:
- key_id: APP_STORE_CONNECT_API_KEY_KEY_ID
- issuer_id: APP_STORE_CONNECT_API_KEY_ISSUER_ID
- key_content: APP_STORE_CONNECT_API_KEY_KEY
- in_house: APP_STORE_CONNECT_API_KEY_IN_HOUSE
If you add everything as environment variables in your CLI, your call to <code>app_store_connect_api_key<code> can be as simple as:
The <code>app_store_connect_api_key<code> action sets a shared variable, <code>Actions.lane_context[SharedValues::APP_STORE_CONNECT_API_KEY<code>, which other actions can easily use. That way, you don’t have to provide your API key to each individual action.
For example:
Adding a fastlane lane
A lane is a workflow of sequential tasks. Each lane has a description and name you can use to execute it.
In this tutorial, we will create lanes for:
- Profiles & Certificate handling
- Building the app
- Uploading the app to TestFlight
- Automating screenshots
- Releasing the app
While these five lanes don’t cover everything you might want to manage and automate in fastlane, they form a solid foundational fastlane setup for you to start with.
Code signing with match
Code signing is mandatory on iOS when distributing your app. It assures that your app’s code can be trusted and hasn't been modified by a third party since it was last signed.
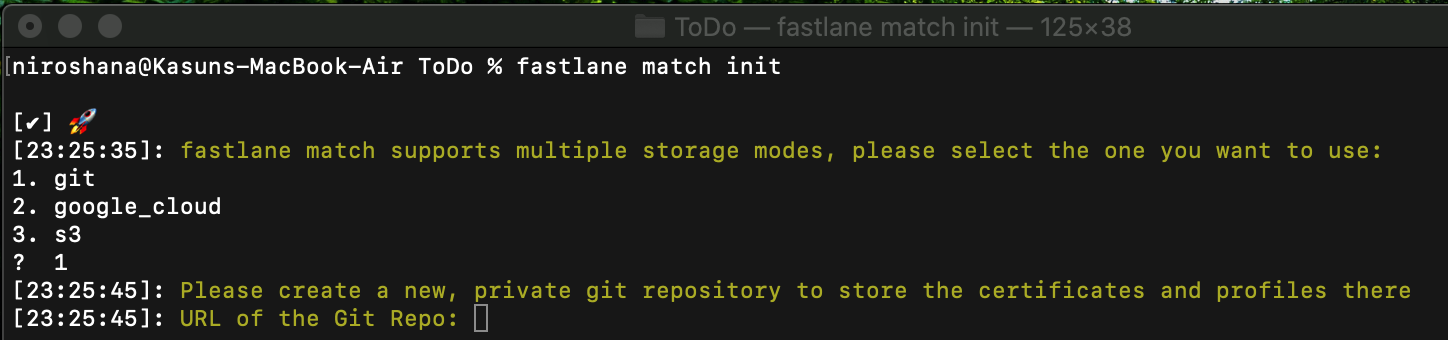
fastlane match gives you a secure way to easily share certificates across your development team. It will keep all required certificates & provisioning profiles in encrypted storage (e.g., private git repository, Google Cloud, or Amazon S3). For this tutorial, we’ll show you how to use a private git repository on GitHub.
Open your terminal and run:
Select your desired storage type and enter the URL:
Once you proceed with a password, certificates will be handled by fastlane match. To create profiles for development and App Store, you can execute the following commands:
Now, check out the Apple Developer Portal. You will see the profiles have been created there:

Note that, with code signing managed by fastlane match, you need to disable automatic code signing in your Xcode project.
You can also add a lane to sync certificates on your machine. Open your Fastfile and add the following:
There are four different types of profiles you can use for the <code>type<code> attribute:
- App Store profile - Used for distributing a production app to the App Store.
- Development profile - Used to install an app in debug mode.
- Enterprise/in-house distribution profile - Used for distributing apps to non-registered devices outside of the App Store; only available with enterprise developer accounts.
- Ad-hoc profile: Used to distribute an app to devices registered in the developer account.
The values to pass for each of these profiles are <code>appstore<code>, <code>development<code>, <code>enterprise<code>, and <code>adhoc<code>, respectively. The specific one you should use depends on your needs and audience, so check out fastlane’s match documentation for more detail.
Building an .ipa file with gym
Archiving and building your app is time consuming, but with fastlane’s gym action, you can automatically generate a signed <code>.ipa<code> file to distribute your app.
In the terminal, execute:
fastlane will create a Gymfile for you. Open the Gymfile and add the following:
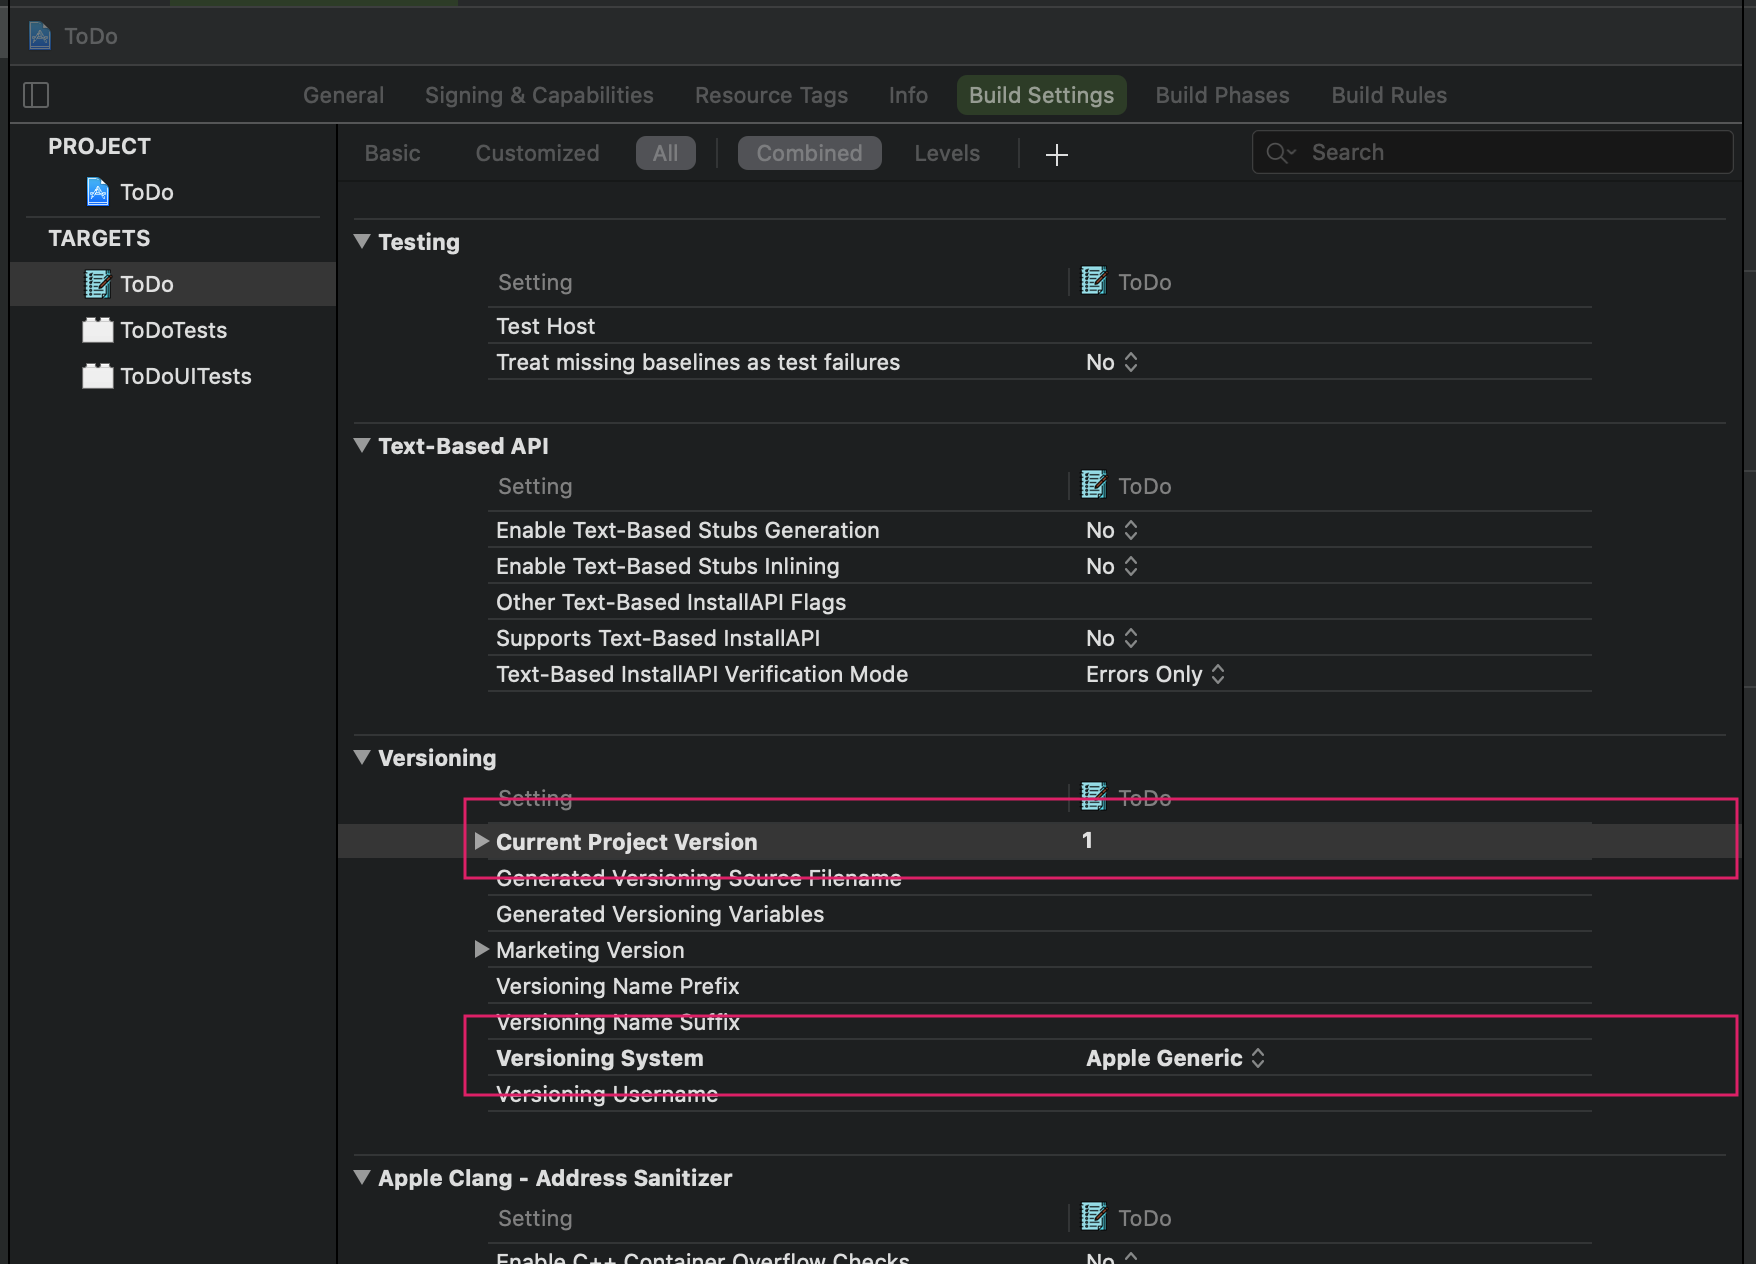
When building your app for TestFlight or the App Store, you must increment the build number each time. To automate this, enable Apple Generic Versioning by changing the app versioning settings:
Open the Fastfile and add the following lane to create an <code>.ipa<code>:
Before building the app, disable automatic code signing and select the correct Provisioning profile in Xcode:
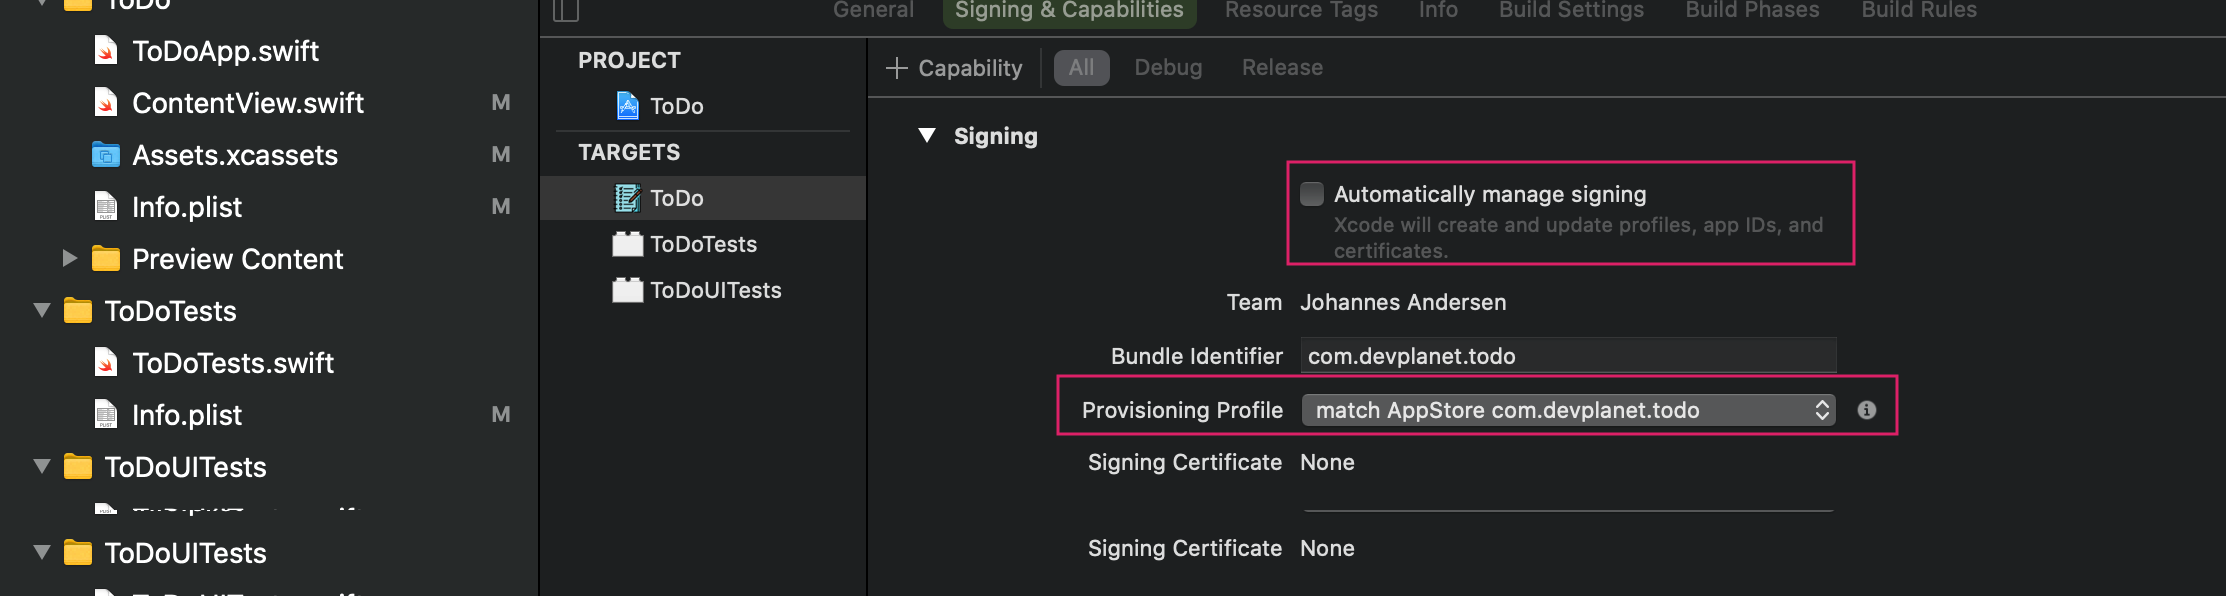
Note that you can also do this using the <code>update_code_signing_settings<code> fastlane action.
Now you’re ready to run <code>fastlane build<code> in your terminal.
Once you get the message that the build is completed, you can find the <code>.ipa<code> file in the <code>fastlane/builds<code> directory.
Uploading to TestFlight with pilot
fastlane interacts with TestFlight through its pilot action (a.k.a. uploadtotestflight).
As you already have a lane to build an <code>.ipa<code> file, you just need to add the <code>pilot<code> command to your Fastfile to upload your build:
If you need to upload a specific <code>.ipa<code> file to Testflight, remove <code>build<code> from the lane and add <code>ipa("./fastlane/builds/ToDo.ipa”)<code>. This will upload the <code>.ipa<code> at the specified filepath.
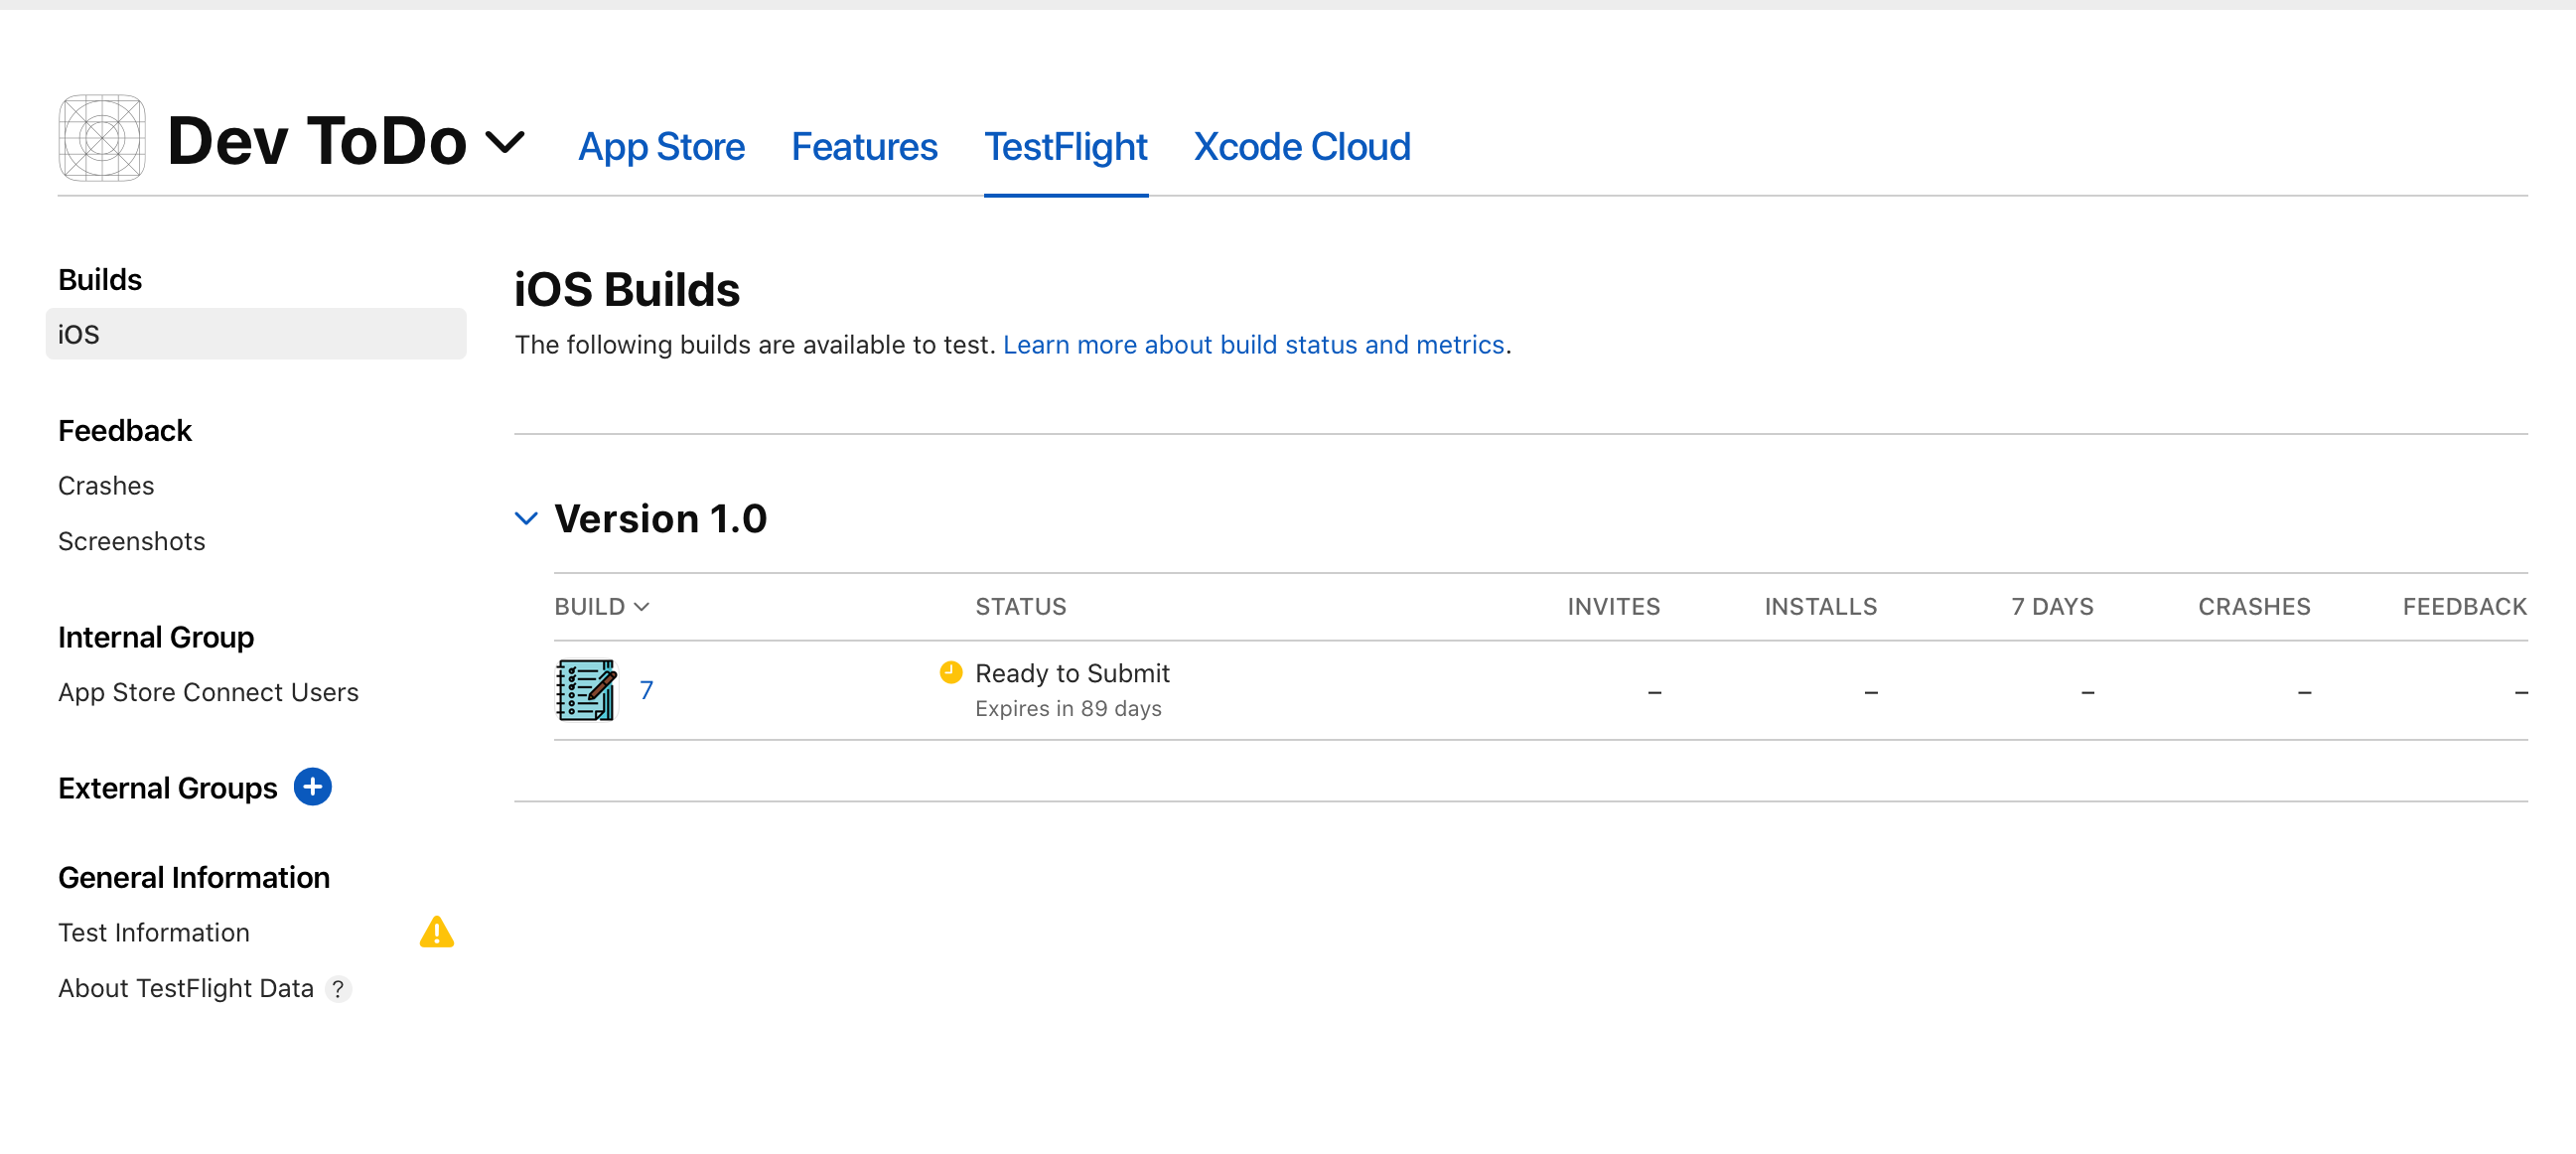
Once fastlane finishes running this lane, you will see the build available in TestFlight:
Add a new tester to the app using the following command:
There are many other commands for pilot which you can explore in fastlane docs.
Adding screenshots
Screenshots are a big part of your app’s App Store presence, and creating and updating these assets is an important part of the release process. Capturing real screenshots on a live, running app takes a lot of effort, especially as you need to generate different versions for different screen sizes and, often, languages. Let’s look at how you can automate this with fastlane.
In order to automate screenshot capture, you’ll need to set up some UI tests first. To easily create UI tests, you can record steps using Xcode and the simulator, automatically generating the required test method code in the process. The details are beyond the scope of this tutorial, so check out this article for more information.
When your UI tests are ready, run the following command:
Once the command is executed, fastlane will show you the steps for configuring <code>snapshot<code>. Go to the newly-created <code>Snapfile<code> inside the <code>./fastlane<code> directory and configure it as shown below, uncommenting any relevant options as needed:
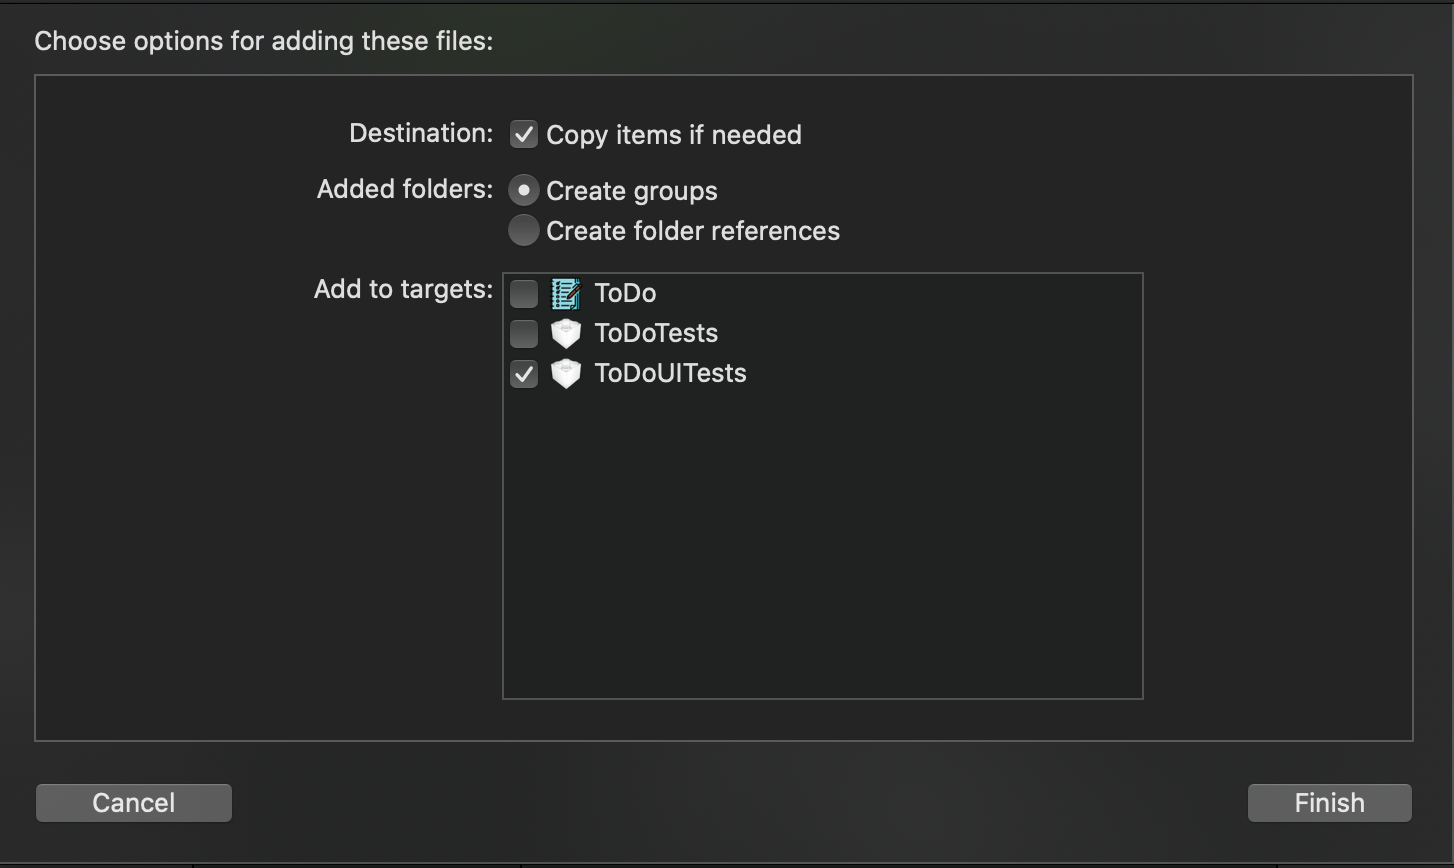
Now open Xcode and drag and drop the <code>SnapshotHelper.swift<code> file into your UI test directory. Choose the options as seen below:
- Copy items if needed
- Create groups
- ToDoUITests
Open your UI test file (called <code>ToDoUITests.swift<code> in the example application), and add the call <code>setupSnapshot(app)<code> before <code>app.launch()<code>. Whenever you want to capture a screenshot, add a call to <code>snapshot("[SCREENSHOT_NAME]")<code>.
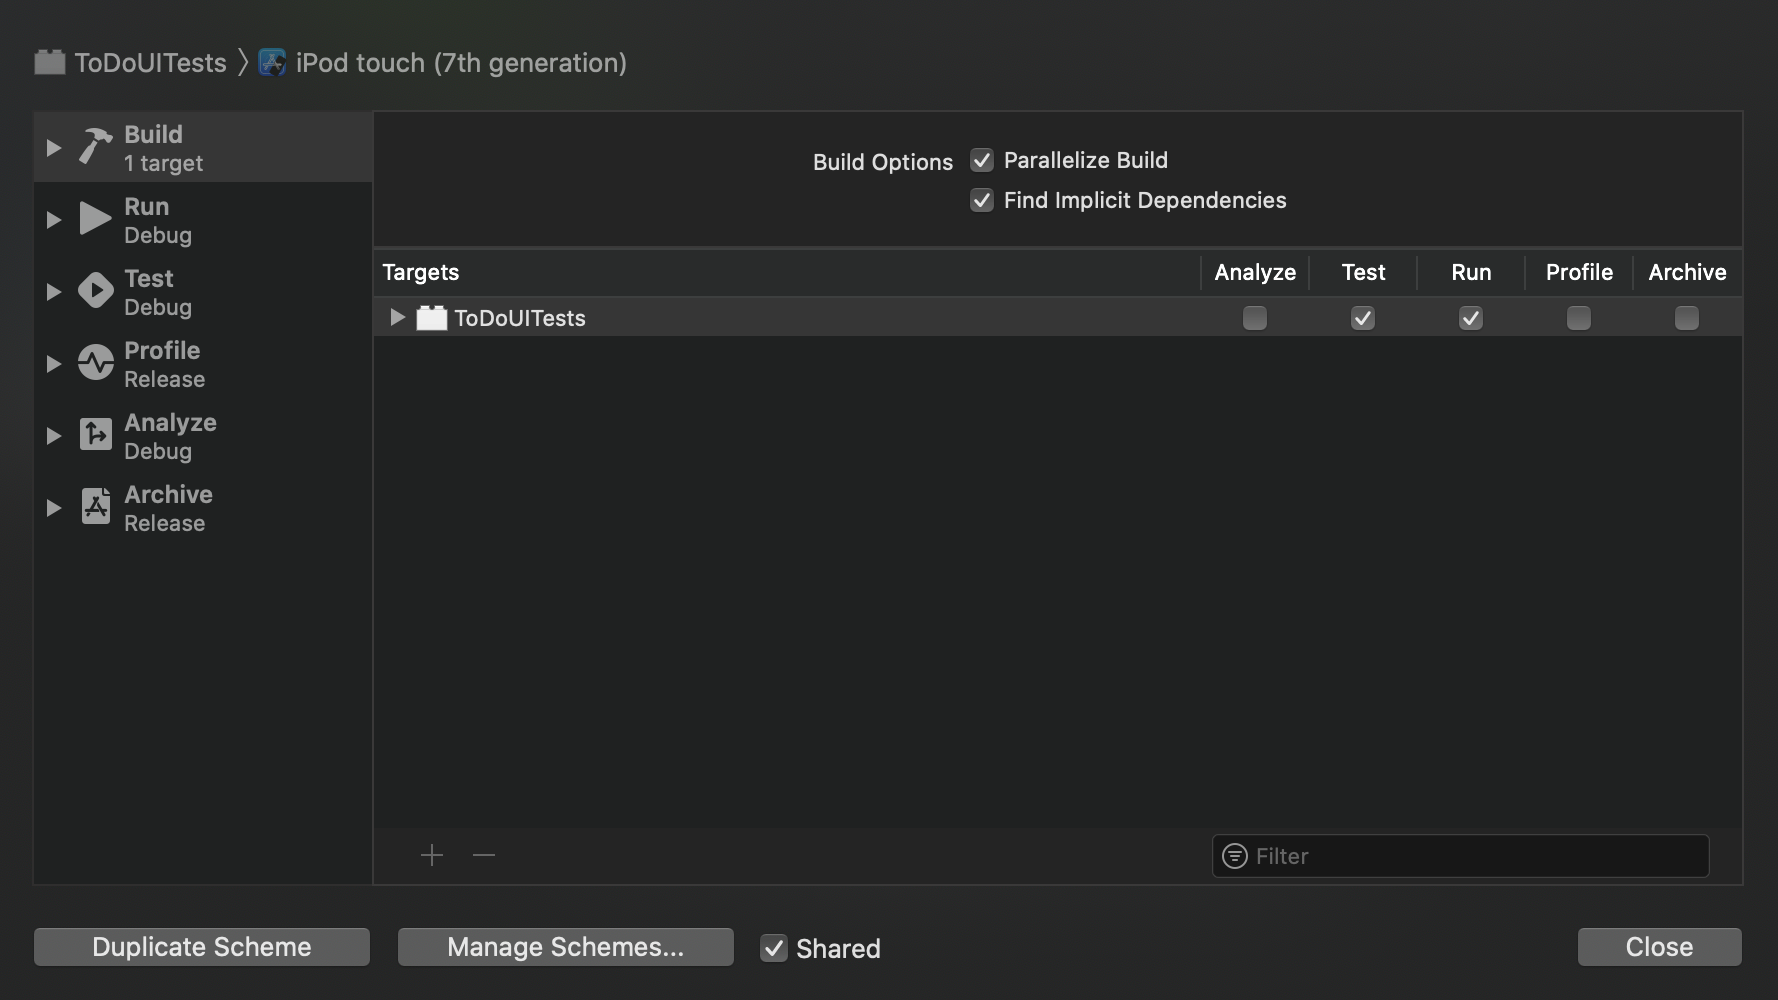
Add a UITest target as an Xcode scheme by opening Product>Scheme>Manage Schemes. Inside Manage Schemes add your UITest target:
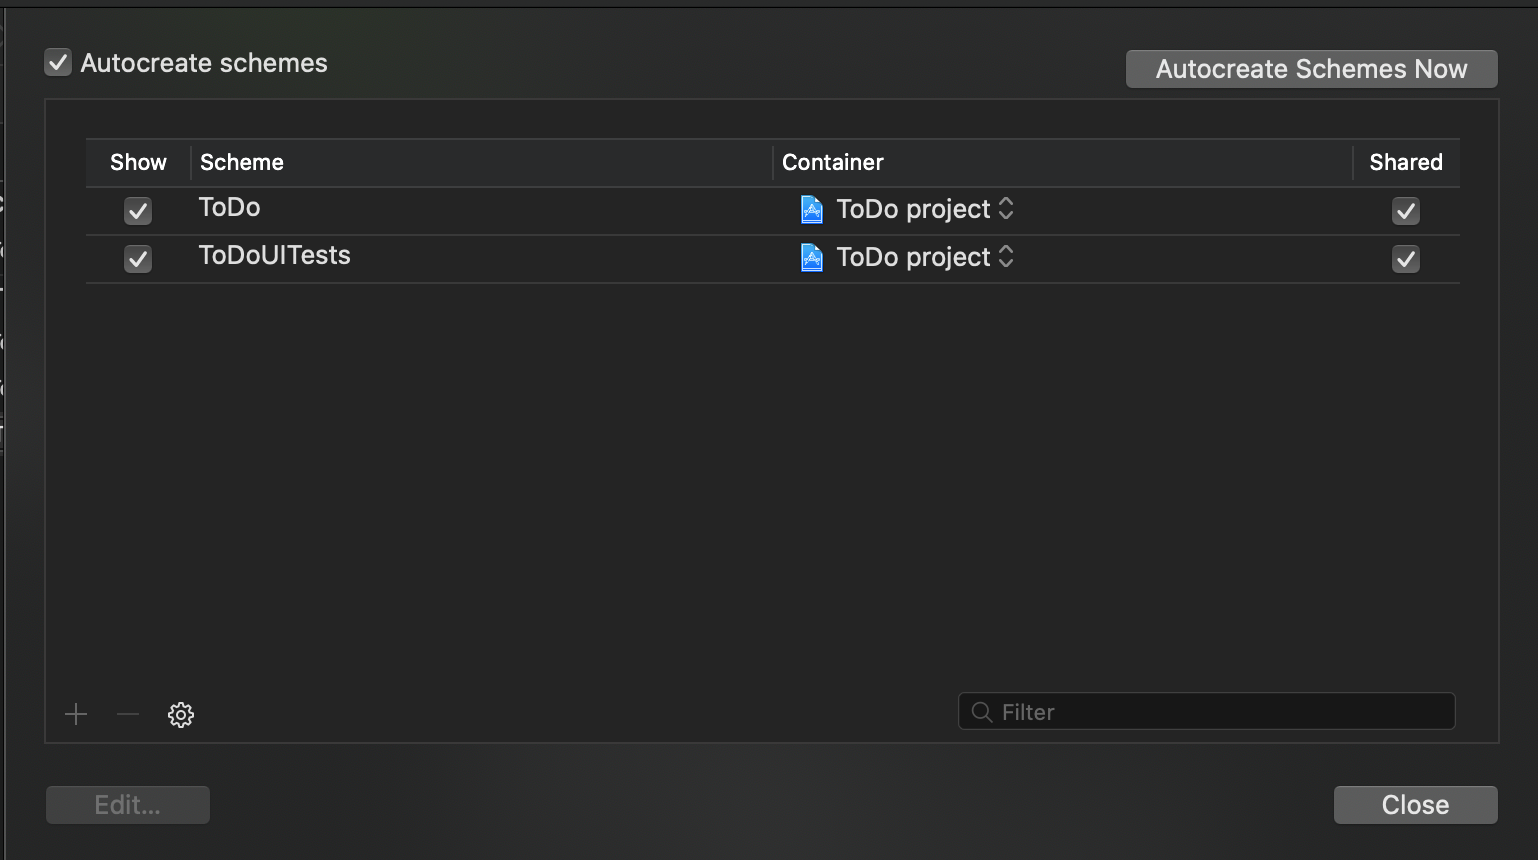
Make sure to enable the shared property. Select the UI Test scheme and click Build on the scheme editor. Then select the Test and Run options and close the window.
Now your Xcode configuration is complete, so you can move on to adding another lane to your Fastfile.
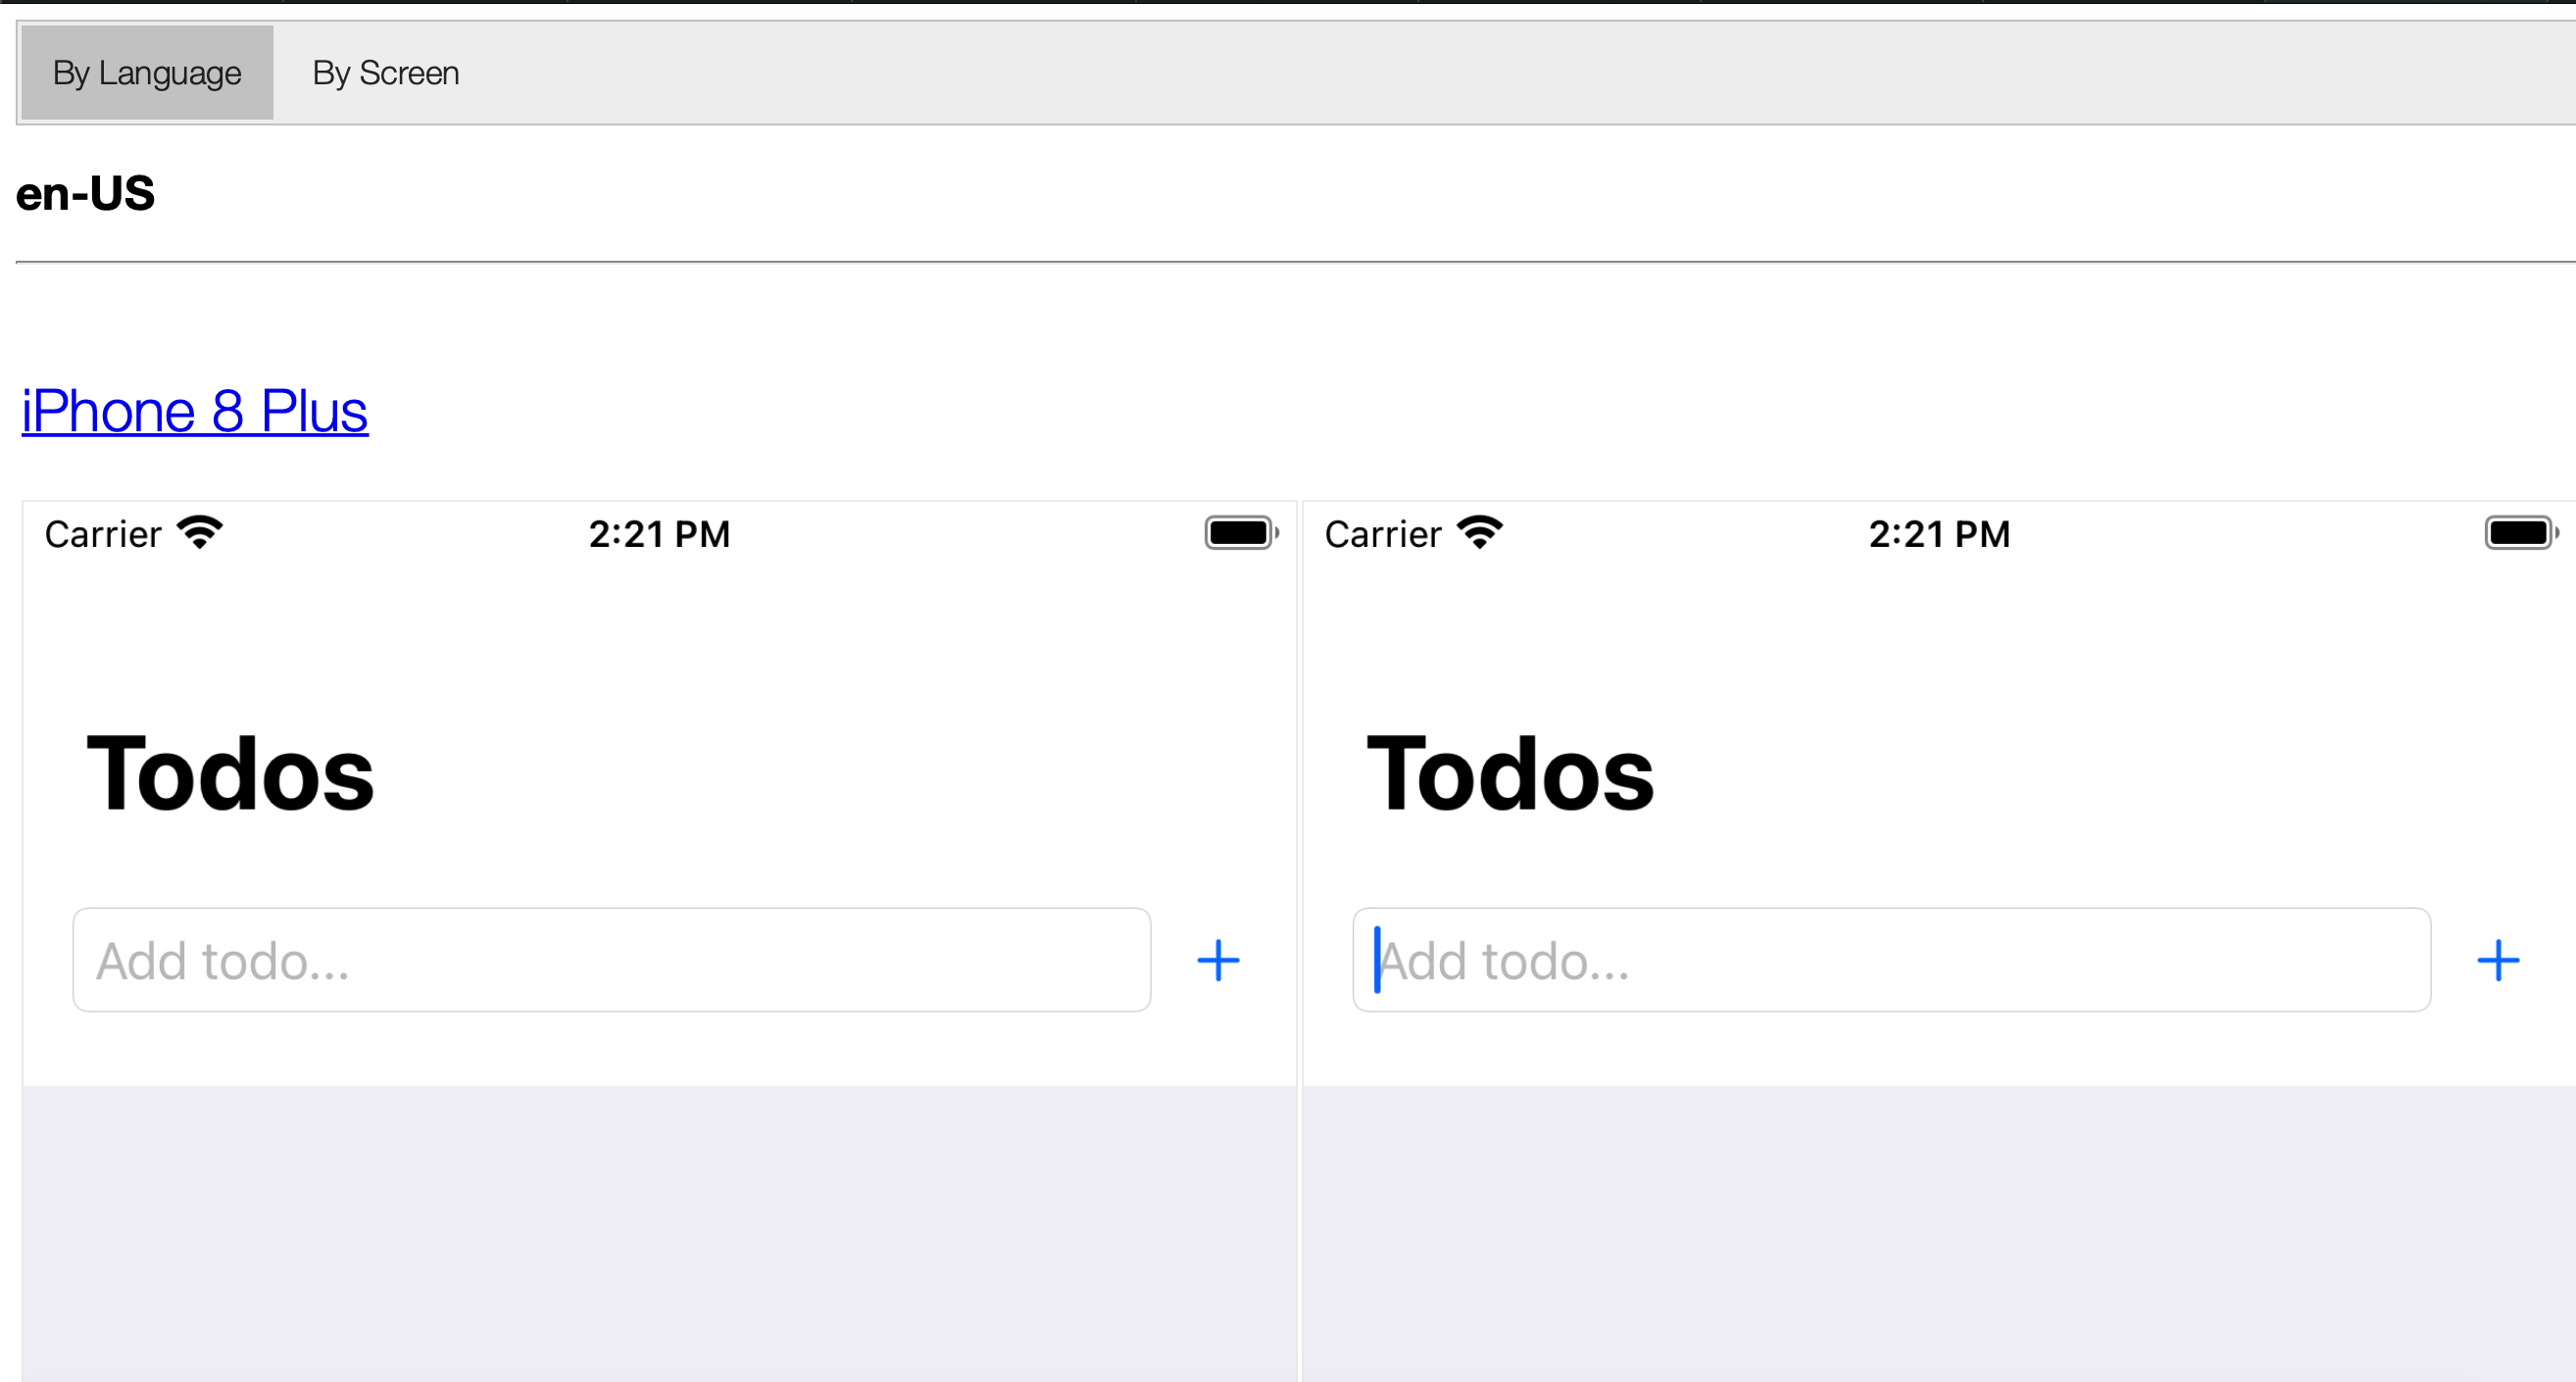
This lane uses snapshot to take screenshots as per your Snapfile's settings:
Run the <code>fastlane screenshot<code> command in your terminal and fastlane will automatically open a preview of your screenshots.
Deployment with fastlane deliver
At this point, you’ve used fastlane to create an app, build your app and generate an .ipa file, and capture screenshots, so now it’s time to get all this information uploaded and submitted to the App Store. fastlane’s deliver action will automate this process for you.
Go to the root directory of your project in your terminal and enter:
Confirm that you’d like to set up and pick Swift or Ruby for your fastlane configuration. We prefer Ruby because fastlane.swift is still in beta.
Once the deliverfile generation is completed, you will see one new file and two new directories inside the <code>./fastlane<code> directory:
- metadata - directory containing App Store metadata.
- screenshots - directory containing the app screenshots.
- deliverfile - file configuring your release and allowing you to set additional values required for App Store release, like pricing tier and export compliance responses.
You will find some text files inside the fastlane directory which are named after their corresponding fields in the App Store (e.g. description, keywords, categories, etc). fastlane will use these files to populate your app's metadata in App Store Connect.
Additionally, you can provide an application rating file that gives Apple the information it needs to calculate your app’s Age Rating. You’ll need to create a JSON file inside the metadata directory named <code>app_store_rating_config.json<code> and include the following:
You’re now ready to upload to the App Store (and, optionally, submit your app for review!). Modify the deliverfile as seen below:
And add the following new lane to your Fastfile:
Finally, execute the fastlane upload command:
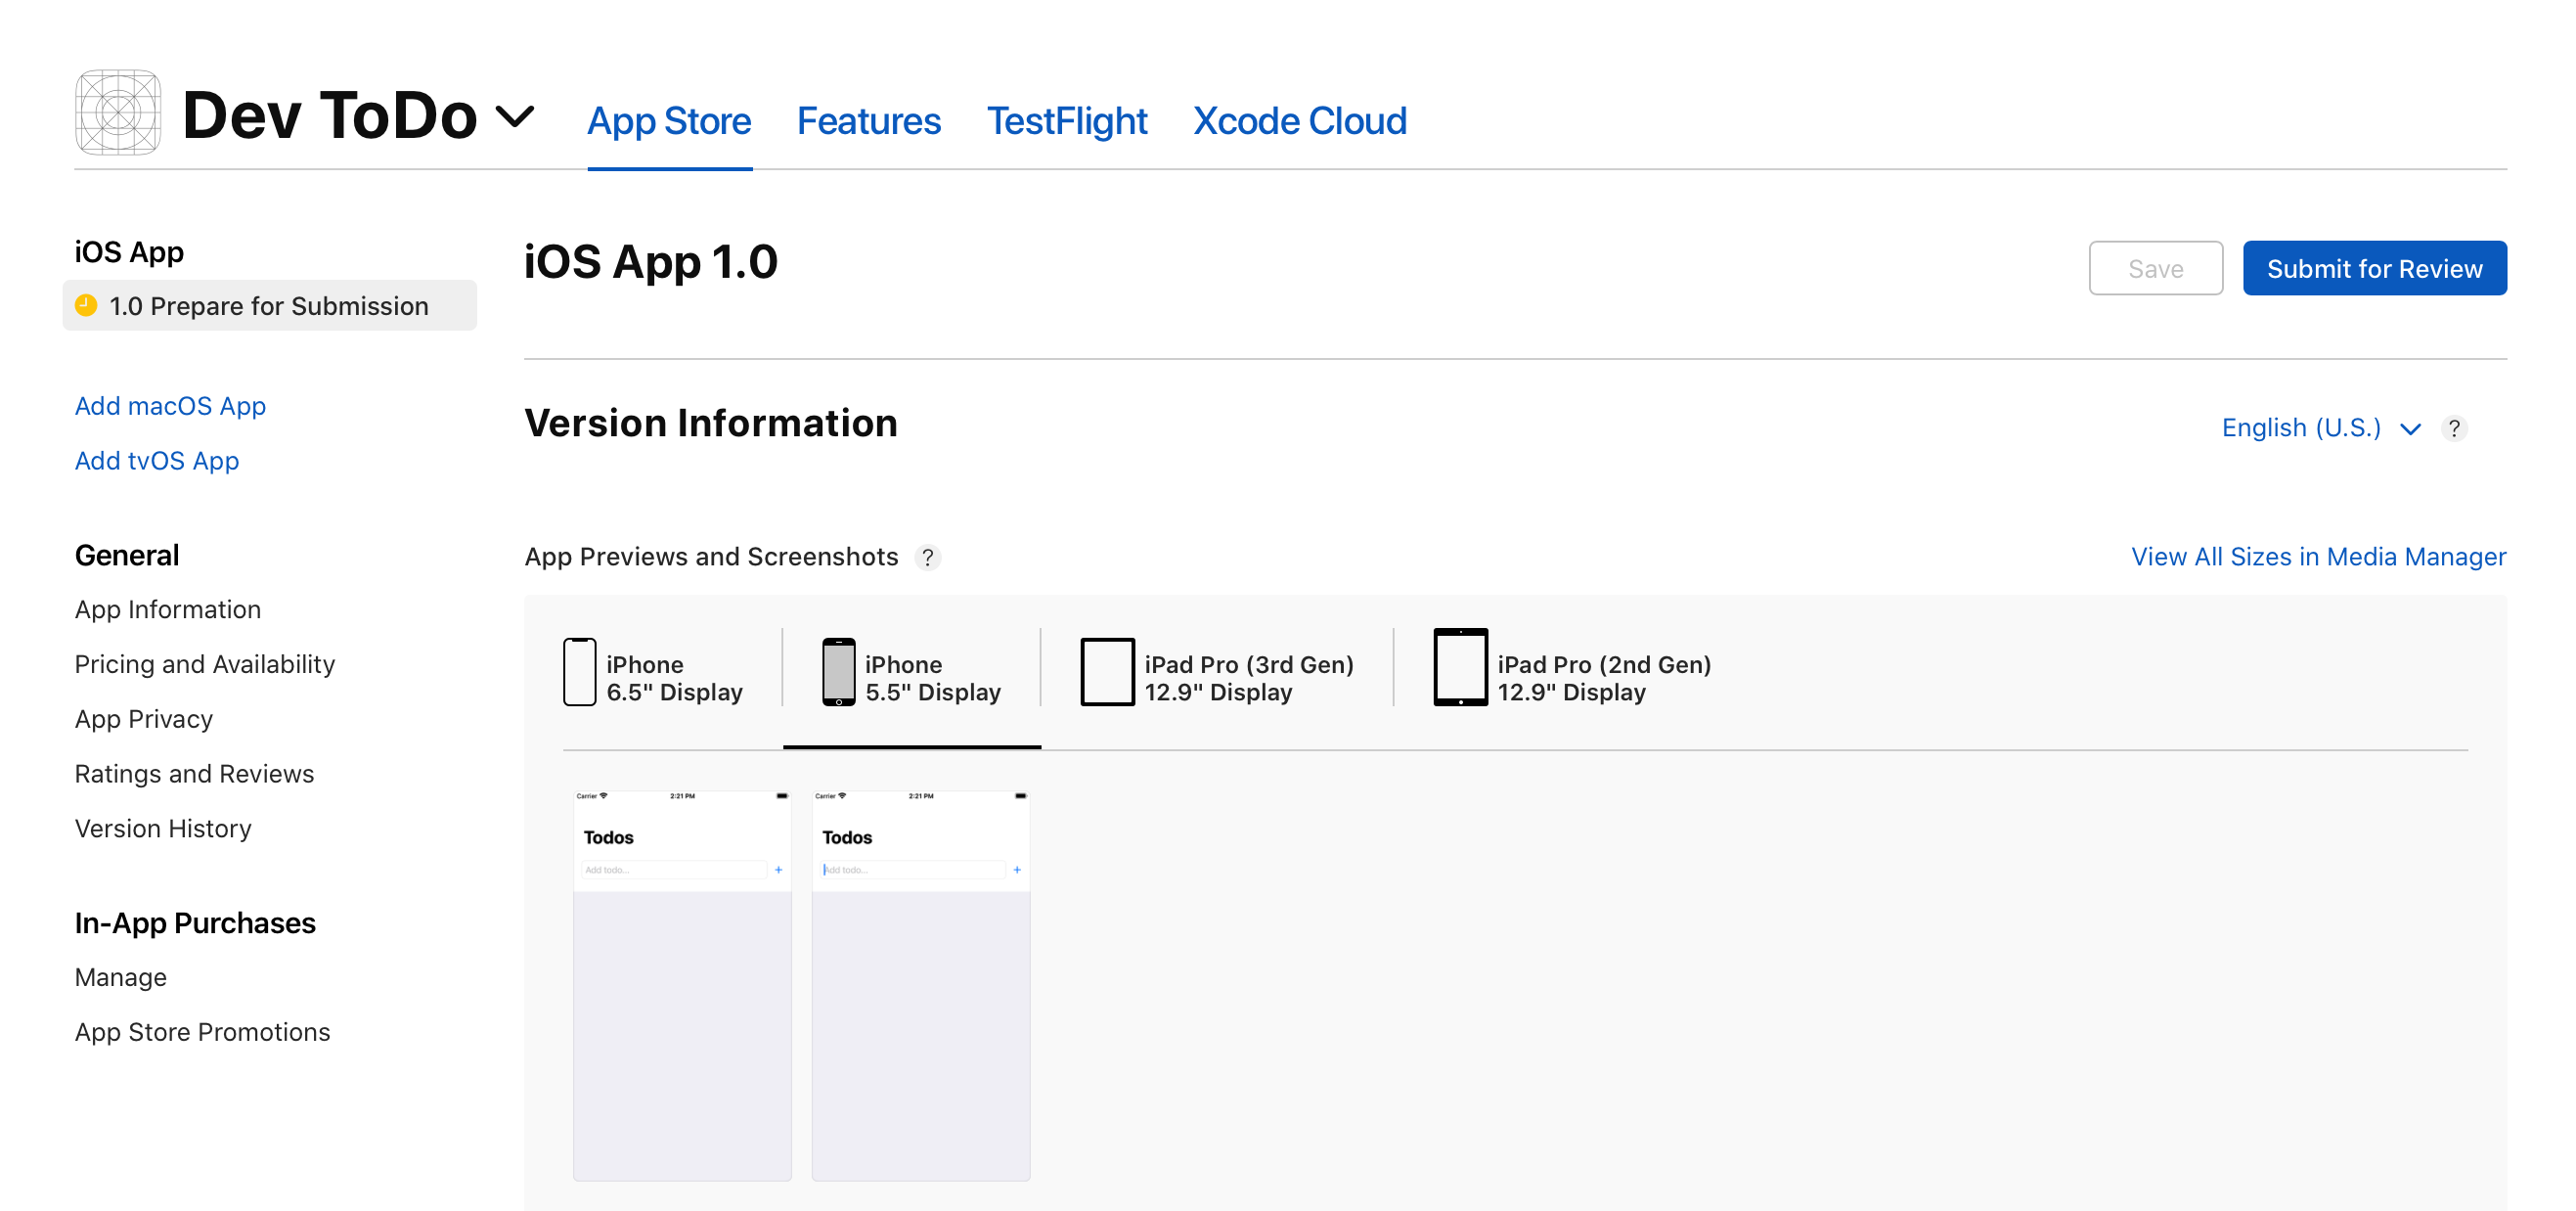
Fastlane will verify the upload information by loading an HTML preview in your browser. Once the lane runs, visit App Store Connect and you will see the build is uploaded and ready to submit for review.
You can also combine all the lanes we created. This single command in your Fastfile will create the app, take screenshots, build, and upload the app to App Store Connect:
Now run <code>fastlane release_app<code>, and fastlane will take care of everything.
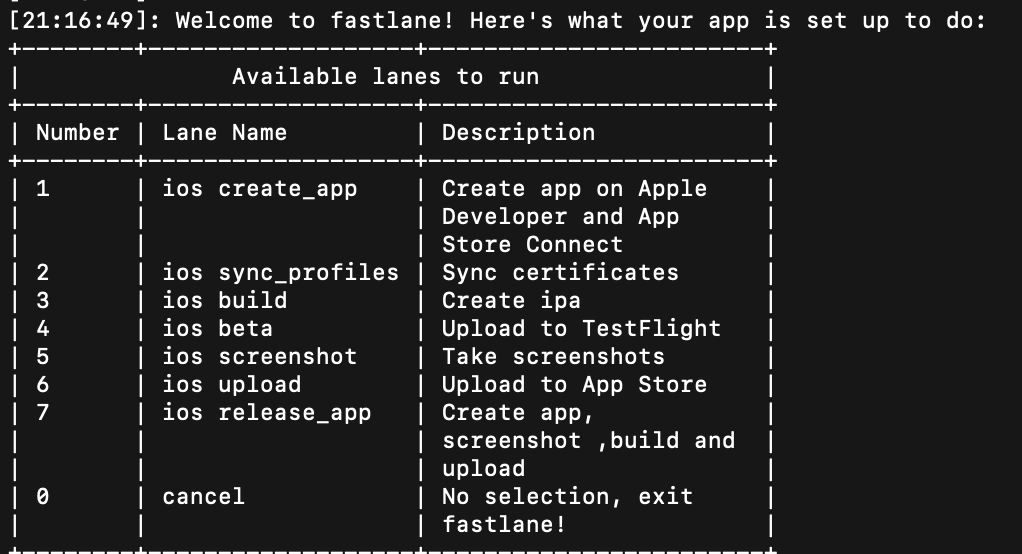
You can check your overall fastlane setup by running <code>fastlane<code> in your terminal. You'll see a list of available lanes so you can run them individually as needed.
Conclusion
Automating your iOS deployment and release process can save you a lot of time and headaches, and it becomes essential when you’re developing and releasing iOS apps at scale. In this tutorial, you took a big step in that direction by building out an automated iOS deployment pipeline using fastlane. It may take some work to set up, but will save you hours of time building, testing, and releasing your app on a regular basis.


